
Trade Date: Monday, May 11, 2026 Instrument: Gold Futures (GC) — COMEX Direction: Long Result: Target hit — full winner (~5R) Tools Used: Mastery Orderblocks + Mastery Energy
If you have ever taken an order block trade on gold, watched price tag your zone, and then sliced straight through your stop, this breakdown is for you. The reason most retail order block trades on Gold Futures (GC) fail is not the zone itself. It is the missing piece between price arrives at the level and price actually reverses from the level. That missing piece is absorption confirmation, and in this article we walk through a live Gold Futures trade where it played out perfectly.
This is a real trade taken on Monday May 11, 2026. We will cover the exact orderblock zones we marked in advance, the 1 minute absorption signal that triggered the entry, the stop loss and take profit logic, and how the trade played out on the 15 minute chart. The full live walkthrough is available on our YouTube channel.
Quick Trade Summary
| Element | Detail |
|---|---|
| Date | Monday, May 11, 2026 |
| Instrument | Gold Futures (GC) — COMEX |
| Direction | Long |
| Entry | ~4,657.7 |
| Stop Loss | Below low of absorption candle |
| Take Profit | 4,708.0 (next mastery orderblock zone) |
| Risk to Reward | ~5R |
| Outcome | ✅ Target filled |
The Two Tools Behind Every Mastery Trade
Before we walk through the chart you need to understand the two tools that made this Gold Futures order block trade possible. They do different jobs and both are essential.
Mastery Orderblocks define where institutional reactions are likely. They are not random support and resistance lines pulled through old wicks. They are zones where confirmed institutional activity has left a footprint significant enough to expect price to react again on the retest. On the charts in this article they appear as the faded black boxes and the red highlighted zones. The point of a Mastery Orderblock is not to tell you to enter a trade. It tells you where to pay attention.
Mastery Energy reads when to act inside a zone. It compares the buying and selling aggression in the current candle against the previous candles. When Mastery Energy spikes higher than the previous 24 candles, that is not normal retail participation — that is aggressive size hitting the tape. It tells you exactly when buyers or sellers commit at the level.
Zones tell you where. Energy tells you when. Combine the two and you remove the guesswork that blows up most order block traders.
Step 1: Establishing Context on the 15 Minute GC Chart
Every Gold Futures order block trade we take starts with higher timeframe context. We do not look for entries until we know what side of the market we should be on.
On the 15 minute GC chart we identified a faded Mastery Orderblock zone overhead between 4,750 and 4,760. Price had rallied into that zone, failed to break through, and was now selling off aggressively, slicing back below 4,700 and heading lower fast.
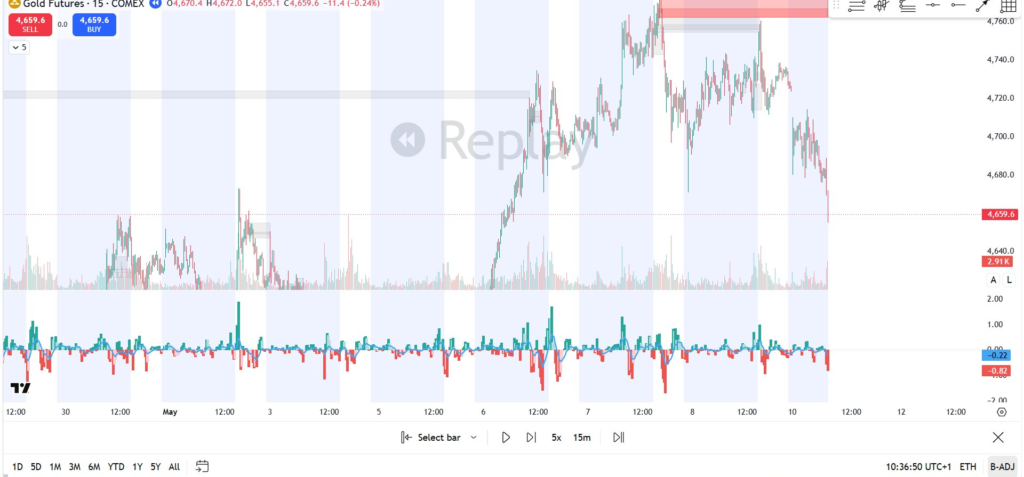
This tells us two things. First, sellers won the fight at the upper orderblock — they were defending it and they pushed price away. Second, price is now becoming extended to the downside. We are not interested in shorting an extended move. We are interested in where price might run into the next Mastery Orderblock, because that is the most probable location for the next reaction.
Step 2: Marking the Mastery Orderblock Reaction Zones
With the higher timeframe context locked in we marked every Mastery Orderblock relevant to the session. Four zones stood out on Gold Futures that morning:
| Zone | Price | Type |
|---|---|---|
| Resistance | 4,713.5 | Overhead Mastery Orderblock |
| Resistance | 4,708.0 | Overhead Mastery Orderblock |
| Support | 4,654.8 | Primary downside Mastery Orderblock |
| Support | 4,646.8 | Deeper support Mastery Orderblock |
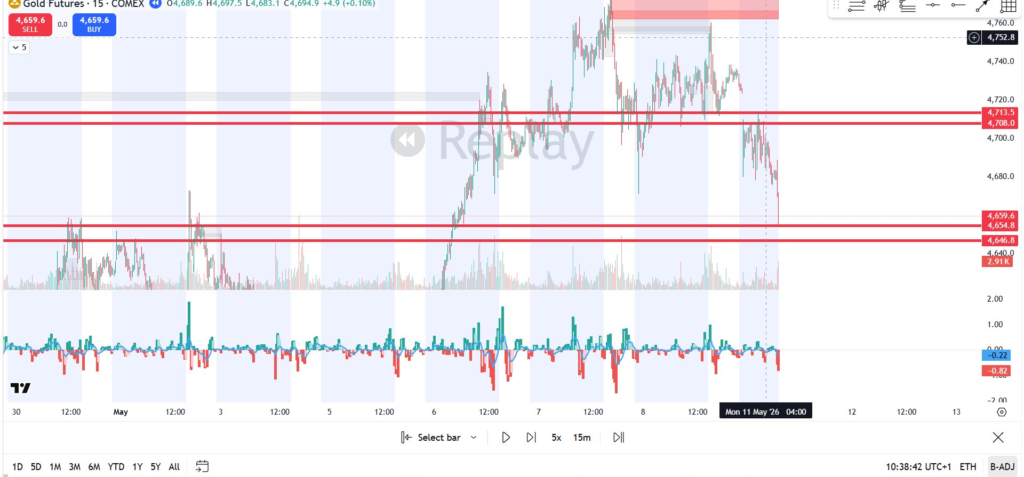
Notice we have not chosen a direction. We have not placed a single order. All we have done is map where the market is likely to react. This is the entire point of trading with Mastery Orderblocks. You build a clean map of the battlefield before the battle begins, so when price arrives at a zone you already know what matters and what to watch for.
Price was now travelling down fast toward our 4,654.8 zone. Time to drop to the execution timeframe.
Step 3: The 1 Minute Absorption Signal That Confirmed the Trade
Here is where most order block traders go wrong. A zone on its own is not a trade signal. Price hits zones and slices straight through them all the time. The question is never “did price hit my level” — it is “who is in control of the candle that touched my level”. That is exactly what Mastery Energy is built to answer.
We dropped to the 1 minute chart as price entered our 4,654.8 Mastery Orderblock. Two specific things happened in sequence:
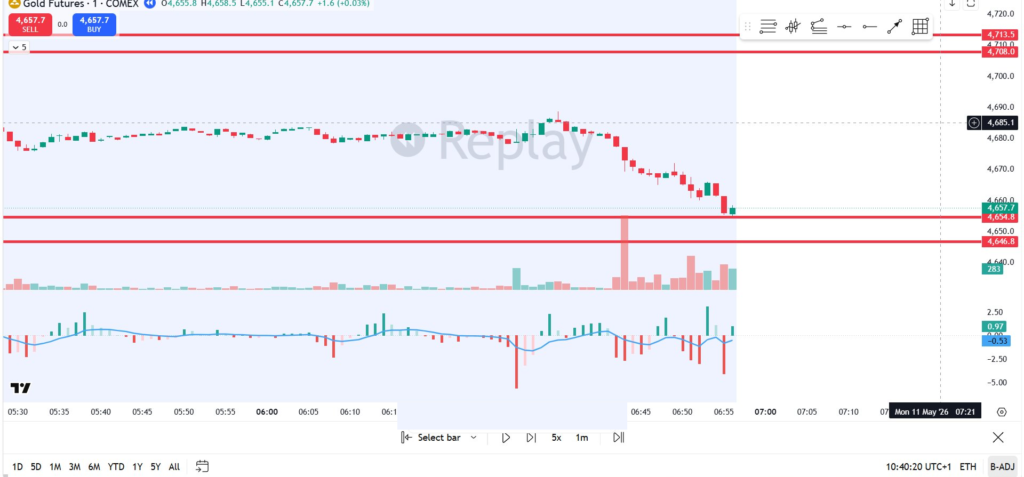
1. A massive red Mastery Energy print on the sell candle. The candle that drove price into the 4,654.8 orderblock printed red Mastery Energy higher than the previous 24 candles. That is not retail panic selling. That is aggressive institutional size dumping into the level. In a normal “support” zone with no institutional defence, this is the candle that breaks the level and stops out every long who tried to catch the falling knife.
2. An immediate green Mastery Energy print on the very next candle. Here is where the trade actually showed itself. Instead of price continuing lower, the very next 1 minute candle printed green Mastery Energy while still inside the orderblock zone. The aggressive sellers got their fills, but price did not move lower. Someone larger was on the other side absorbing every sell order at our zone.
This is the textbook definition of order block absorption:
Aggressive sellers hit a predefined Mastery Orderblock → Mastery Energy confirms they were absorbed → the next candle prints green energy with no continuation lower → the market has just shown its hand.
No absorption confirmation, no trade. With absorption confirmation, the orderblock becomes a signal.
Step 4: Entry, Stop Loss and Take Profit
With the Mastery Orderblock zone and the Mastery Energy absorption signal aligned, the trade plan was mechanical.
- Entry: Long after the close of the green absorption candle at approximately 4,657.7
- Stop Loss: Just under the low of the absorption candle — tight because the structure was clean
- Take Profit: The next Mastery Orderblock overhead at 4,708.0
Reward to risk worked out to roughly 5R. Every parameter came from the chart, not from emotion.
Step 5: Trade Management on the 15 Minute Chart
The instant we were in the trade we switched back to the 15 minute chart. This is one of the most important discipline rules in our trading: the 1 minute is for entry confirmation only. It is far too noisy to manage a trade on. The moment you start watching every 1 minute wick you will panic out of a position that was working.

Gold Futures did exactly what the orderblock and the energy reading suggested. After the absorption at 4,654.8, buyers stepped in, price consolidated briefly, then rallied cleanly through 4,680, through 4,700, and tagged our 4,708.0 Mastery Orderblock target zone.
✅ Target filled. Trade closed for a full winner.
Why This Gold Futures Order Block Trade Worked
This was not luck. It was a repeatable process built on three pillars, and these three pillars line up the same way on every Mastery setup:
1. The orderblock was predefined. The 4,654.8 zone was on the chart before price reacted, not after. This is the only way to trade an order block with confidence — you committed to the level before the emotion of the move arrived. If you are drawing zones after price already reacted, you are not trading order blocks, you are rationalising hindsight.
2. Mastery Energy confirmed absorption inside the orderblock. Aggressive red Mastery Energy hit the zone, then immediate green Mastery Energy followed with no continuation lower. Without that energy confirmation, the orderblock alone would have been a hope trade. The energy signal is what filters out the orderblock traps where price slices through and stops out every premature long.
3. The target was the next Mastery Orderblock. We targeted 4,708.0 because the orderblock told us that is where the next reaction was likely. Random profit targets get hit by random noise. Structural targets get hit by structural moves. This is how you achieve a 5R outcome without using a fixed reward to risk that has no relationship to actual market structure.
Why This Setup Style Is Built for Funded Account Traders
If you are trading a prop firm evaluation or a live funded account, this exact framework is engineered to protect your account while delivering asymmetric returns:
- Risk is mechanical. The stop loss is the low of one specific candle — not “wherever feels safe” — which is critical for protecting a trailing drawdown.
- Reward to risk is asymmetric. A 5R target means you can lose more trades than you win and still grow the account.
- The entry is filtered by data, not emotion. Without a Mastery Energy absorption signal, there is no trade — full stop.
- Trade management is locked to the higher timeframe. Entering on the 1 minute and managing on the 15 minute keeps you out of the noise that shakes most funded traders out of their winners.
Most funded accounts do not blow because the trader is bad. They blow because the trader has no defined process for where to look and when to act. Mastery Orderblocks answer the first question. Mastery Energy answers the second.
Common Questions About Order Block Trading on Gold Futures
Why use orderblocks instead of standard support and resistance on gold futures? Standard support and resistance lines are subjective. Mastery Orderblocks identify the exact zones where institutional orders were filled, which is why price tends to react at them on the retest. On a fast-moving instrument like Gold Futures, that precision is the difference between a tight stop and being wicked out before the real move.
What timeframe is best for order block trading on GC? We map zones on the 15 minute chart for context, then drop to the 1 minute for entry confirmation via Mastery Energy. Manage the trade back on the 15 minute. The 1 minute is for entry only — never for management.
How do you confirm order block absorption? A valid absorption signal requires two things in sequence. First, aggressive Mastery Energy in the direction of the existing move as price enters the zone (higher than the previous 24 candles). Second, an immediate reversal in Mastery Energy on the next candle while price is still inside the zone. Without both, there is no trade.
What if the orderblock zone fails? That is exactly why the stop loss is mechanical — placed under the low of the absorption candle. If price violates that low, the absorption thesis was wrong and the trade is invalidated quickly with a small, defined loss.
Watch the Full Live Breakdown on YouTube
This article walks through the static logic of the trade. For the live walkthrough — the real time Mastery Energy reading, the entry execution, and the management as it played out tick by tick — head over to our YouTube channel where we post the full breakdown of every trade we share here.
👉 https://www.youtube.com/watch?v=MSFgW906dro&t=1234s
Learn to Trade Setups Like This
If you want to learn how to identify Mastery Orderblocks on your own charts and read Mastery Energy in real time to confirm your entries, join Mastery Trader Academy and get inside the community.
You will get weekly live trade breakdowns, the full Mastery Orderblock and Mastery Energy methodology, and access to our community of funded prop firm traders.
Stop guessing at levels. Start reading the market the way institutions do.
Disclaimer: This Gold Futures (GC) trade breakdown is for educational purposes only and is not financial advice. Futures trading involves substantial risk of loss and is not suitable for every investor. Past performance is not indicative of future results. Always trade with a defined risk plan and never risk more than you can afford to lose.